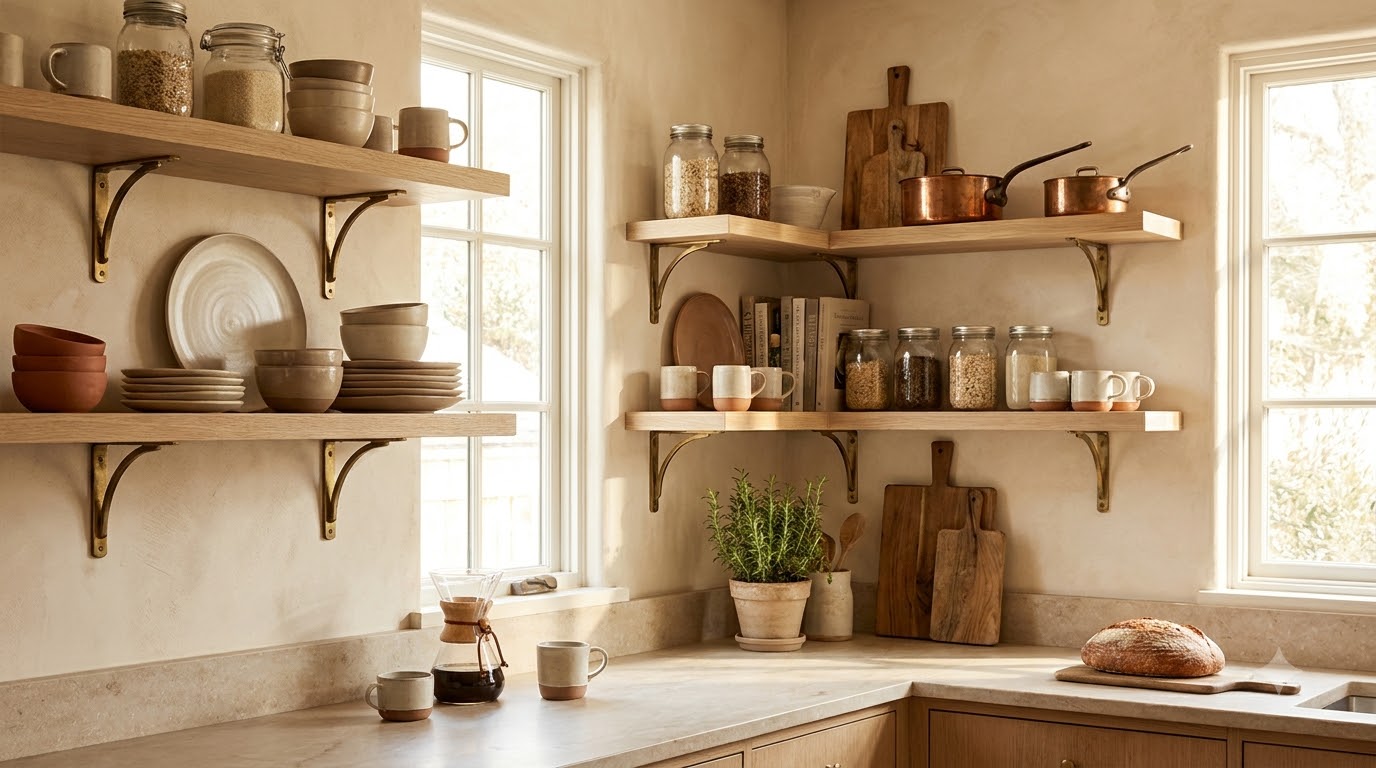
Kitchen open shelving works best when it earns its keep: stack the dishes you actually reach for, prop a wood cutting board against the wall, tuck two small baskets for the clutter, and let one trailing plant soften the corner. That is the whole formula. We aim for roughly 70% useful items and 30% decorative ones on every shelf, so the wall looks styled but still feeds you dinner. For US renters in small kitchens, open shelves are the rare upgrade that adds storage and character without a single cabinet door or a call to the landlord.
Key Takeaways
- Style kitchen open shelving with a 70/30 split: 70% functional (daily dishes, glasses, mugs) and 30% decorative (a plant, a board, one object).
- Keep shelves 10 to 12 inches deep and space them 12 to 16 inches apart so plates and tall glasses actually fit.
- Renters can use no-drill options: a floating shelf on French cleats, a leaning ladder shelf, or heavy-duty adhesive brackets rated for the weight.
- Budget for $15 to $60 per shelf; a full two-shelf wall usually lands between $40 and $150 depending on bracket type.
- Group by color and material, leave breathing room, and put everyday items at eye level for a kitchen that reads calm, not cluttered.
Why open shelving is a renter’s small-kitchen secret
When we downsized into a 600-square-foot apartment with exactly three upper cabinets, open shelving is what saved the kitchen. Instead of cramming everything behind doors, we pulled our daily dishes into the open and suddenly the room felt twice as big. That is the quiet magic here: open shelves trade visual weight for air. Doors stop your eye; open shelves let it travel, and in a small kitchen that borrowed depth matters.
The trade-off is honesty. Open shelves show everything, so they force a light edit of what you own. For renters that is a feature, not a bug, since the same restraint that keeps shelves pretty also keeps you from hauling three boxes of chipped mugs to your next apartment. Open shelving pairs naturally with the rest of a compact home, so it slots right into broader small apartment kitchen ideas without a renovation.
Here is what open shelving does especially well in a rental:
- Makes a small kitchen feel more open by removing bulky cabinet doors from your sightline.
- Keeps daily dishes within one reach, so you cook and clean up faster.
- Adds display space for plants and boards without buying a single new piece of furniture.
- Installs and removes cleanly with no-drill hardware, protecting your deposit.
- Costs a fraction of a cabinet, usually under $60 per shelf.
How deep should open kitchen shelves be?
Open kitchen shelves should be 10 to 12 inches deep. That range holds a standard 10.5-inch dinner plate and a stack of bowls with a little clearance, while staying shallow enough that you are not banging your head or blocking light. Anything under 8 inches limits you to mugs and spice jars; anything over 13 inches starts to feel bulky and defeats the airy look you came for.
Spacing between shelves matters just as much as depth. We space ours 12 to 16 inches apart vertically. That leaves room for tall water glasses and a stacked set of plates plus a mug on top. Here are the numbers we keep taped inside a cabinet door:
- Depth: 10 to 12 inches for plates and bowls; 6 to 8 inches for a spice or mug-only shelf.
- Vertical spacing: 12 to 16 inches between shelves for everyday dishware.
- Height of the lowest shelf: 18 to 20 inches above the countertop so small appliances still fit under it.
- Bracket spacing: support every 24 to 32 inches of shelf length to prevent sagging.
- Weight limit: plan for 15 to 25 pounds per bracket, or 30 to 50 pounds per shelf with two solid brackets.
A quick weight reality check: a stack of eight ceramic dinner plates runs about 12 to 16 pounds, and a full set of everyday dishes can hit 25 to 30 pounds fast. Always know your bracket rating before you load a shelf, especially with renter-friendly adhesive hardware, which typically maxes out lower than drilled brackets.
What do you put on kitchen open shelves?
Put the things you use every day within easy reach, then add a few beautiful objects to fill the gaps. The reliable mix is stacked dishes, wood cutting boards, one plant, and a couple of baskets, held to that 70% useful and 30% decorative ratio. When we style a shelf, we start with the workhorses and treat the pretty stuff as seasoning, not the meal.
Functional pieces that look good in the open:
- Stacked dinner plates and bowls in one or two colors.
- Everyday glasses and mugs, grouped by type.
- Wood or marble cutting boards, propped upright as a backdrop.
- Baskets or a small bin to corral tea, snacks, or dish towels.
- A ceramic crock holding wooden spoons and spatulas.
Decorative pieces that earn the other 30%:
- One trailing plant, like pothos, to soften a hard corner.
- A short stack of cookbooks laid flat as a riser for a small object.
- A single ceramic vase or a small framed print leaned against the wall.
- A wood board or a linen tea towel to add warm texture.
If you want greenery that survives a busy kitchen with low light, our shortlist of low-maintenance indoor plants for beginners covers the ones that forgive a missed watering. For placement ideas by room, this guide to the best indoor plants for every room helps you pick a variety scaled to a small shelf.
How to style open shelves, zone by zone
The easiest way to avoid a cluttered look is to give each shelf a job. Think in zones from top to bottom, matching the height and weight of items to how often you reach for them. Heavy and daily goes low; light and decorative goes high. The table below is the exact zoning we use on a three-shelf wall.
| Shelf zone | What goes here | Why it works |
|---|---|---|
| Top shelf (highest) | Lightweight decorative pieces: a plant, a vase, a leaned print | Rarely touched, so height is fine; keeps weight off the highest bracket |
| Middle shelf (eye level) | Everyday dishes, glasses, and mugs | The reach zone; daily items stay easy to grab and put back |
| Bottom shelf (lowest) | Heavier items and baskets: bowls, boards, a bin of pantry staples | Low center of gravity is safer and hides small clutter in baskets |
Within each zone, a few styling moves do most of the heavy lifting:
- Group like with like: cluster mugs together, plates together, glasses together, so the eye reads order.
- Vary height with a stack: lay cookbooks or a board flat, then set a small object on top to create a step.
- Leave 20 to 30% of each shelf empty so the arrangement can breathe.
- Repeat one material, like wood or white ceramic, across shelves to tie the wall together.
- Anchor each shelf with one taller item on the left or right, not dead center.
Open shelving vs closed cabinets: which fits your kitchen?
Neither wins outright; it depends on how much you own and how tidy you like to keep things on display. Open shelving rewards a light kitchen and a bit of upkeep. Closed cabinets hide mess but close in a small room. Most renters we know land on a hybrid: keep the cabinets they have and add one or two open shelves for the pretty, daily pieces.
- Choose open shelving if your kitchen is small and dark, you own a curated set of dishes, and you do not mind a quick weekly wipe-down.
- Choose closed cabinets if you store a lot, cook heavily and generate grease, or you would rather not dust display items.
- Do a hybrid if you want the airy look but need bulk storage; put daily dishes on open shelves and stash the rest behind doors.
One honest note on maintenance: open shelves near a stove collect a fine film of cooking grease and dust, so items you rarely use will need a rinse before company. That is another reason to keep only high-rotation dishes in the open. If storage is your real bottleneck, pair a shelf or two with smarter small apartment storage ideas so the open display stays lean.
Renter-friendly ways to hang open shelves
You do not need a drill or a landlord’s blessing to add open shelving. Several no-damage and low-damage options hold real weight, as long as you respect their limits. We have used all three of these in past apartments and gotten our full deposits back.
- Leaning ladder shelf ($30 to $80): zero wall damage, rests on the floor and leans against the wall; best for lightweight decorative loads.
- Heavy-duty adhesive brackets ($15 to $35 per pair): hold roughly 10 to 15 pounds per pair on smooth walls; ideal for a mug or spice shelf.
- Drilled floating shelf with anchors ($25 to $60): the sturdiest option at 30 to 50 pounds; leaves small holes you can patch with spackle at move-out.
- Tension-rod or over-cabinet shelf ($20 to $45): clever no-drill picks that borrow support from existing structure.
Whatever you pick, weigh a loaded shelf in your head before you hang it. A shelf holding eight plates, four mugs, and a plant can easily reach 20 to 25 pounds, which rules out most adhesive-only brackets. When in doubt, drill into a stud, use proper anchors, and keep a $5 tube of spackle for move-out day. Open shelving is one of the cheapest, highest-impact upgrades in any renter’s toolkit of small apartment decor ideas.
Frequently Asked Questions
How much weight can open kitchen shelves hold?
A drilled floating shelf on two solid brackets holds about 30 to 50 pounds, or 15 to 25 pounds per bracket. Renter-friendly adhesive brackets are weaker, usually 10 to 15 pounds per pair. Since a stack of eight plates alone weighs 12 to 16 pounds, always match your load to your hardware rating.
How far apart should kitchen open shelves be?
Space shelves 12 to 16 inches apart vertically for everyday dishes, tall glasses, and stacked plates. Set the lowest shelf 18 to 20 inches above your countertop so small appliances fit beneath it. If a shelf holds only mugs or spice jars, you can tighten the gap to about 10 inches.
Are open shelves a good idea in a small kitchen?
Yes. Open shelves remove bulky cabinet doors from your sightline, which makes a small kitchen feel larger and brighter. They also keep daily dishes within one reach. The trade-off is upkeep, since everything shows, so they work best when you display a curated, high-rotation set of dishes and keep clutter in baskets.
How do I keep open shelves from looking cluttered?
Follow the 70/30 rule, group items by color and material, and leave 20 to 30% of each shelf empty for breathing room. Put daily dishes at eye level, hide small odds and ends in baskets, and repeat one material across shelves. Editing down to what you truly use is the single biggest fix.
What is the cheapest way to add open shelving as a renter?
A leaning ladder shelf at $30 to $80 adds display space with zero wall damage. For a mounted look, heavy-duty adhesive brackets run $15 to $35 per pair on smooth walls. A single drilled floating shelf costs $25 to $60 and patches easily with spackle at move-out for a near-invisible repair.
The bottom line on styling kitchen open shelving
Great kitchen open shelving is mostly restraint plus a little warmth. Hold to the 70/30 rule, keep shelves 10 to 12 inches deep and 12 to 16 inches apart, load daily dishes at eye level, and let one plant and one wood board do the decorating. Respect your weight limits, pick hardware that fits your lease, and edit down to what you actually use. Do that, and even a tiny rental kitchen will look like it was styled on purpose, because it was.